


My most ambitious bake yet
Plus: spicy flying raisins, peanut butter cups and quick bread

If you’re new here, hello and welcome! I’m Mark - and I have absolutely no idea what I’m doing in the kitchen. I’m documenting my journey to become a better cook and food photographer. To learn a little bit more about me (and my dog Hiro, who’ll you see a lot of!), the below post is the best place to start:

Hello, friends - and welcome back!
Apologies for missing last week’s post - I’ve been rather poorly for the past couple of weeks and was unable to do any writing. I’ve been ordered by the Dr to rest, but I am back to pottering around the kitchen and pretending to know what I’m doing in the garden. I also couldn’t wait to have a quick catch up with you.
I’m not the only one who has been in the wars this week, however…

Oh dear. Hiro decided to celebrate World Bee Day this year, by trying to eat one. He has very much learned the stinging truth that bees are much more than just spicy flying raisins! After a couple of days feeling very sorry for himself, he is back to being prince of the castle. Something tells me that knowing Hiro, no lessons have been learned.
Despite the dramas, or perhaps in spite of them, I did attempt my most ambitious make yet this week… a quiche! We also have some very exciting developments on the kitchen windowsill - take a look at how well the cherry toms, cucamelons and basil are doing.


I may have underestimated how quickly the cucamelons were going to climb and I don’t think my makeshift stick supports are going to be of use to them for much longer. If you have any suggestions on how to add extra supports would be greatly appreciated!!
Here’s what recipes you’ll find in today’s post:
Peanut butter and chocolate cups
Emergency bread
Asparagus and feta quiche
Join the crew!
This Substack is a safe space where we can all learn, laugh and love food together. Perhaps, like me, you’re just finding your way around the kitchen, or maybe you have years of fantastic experience and tips to offer - everyone is very much welcome. If that sounds good to you, subscribe!
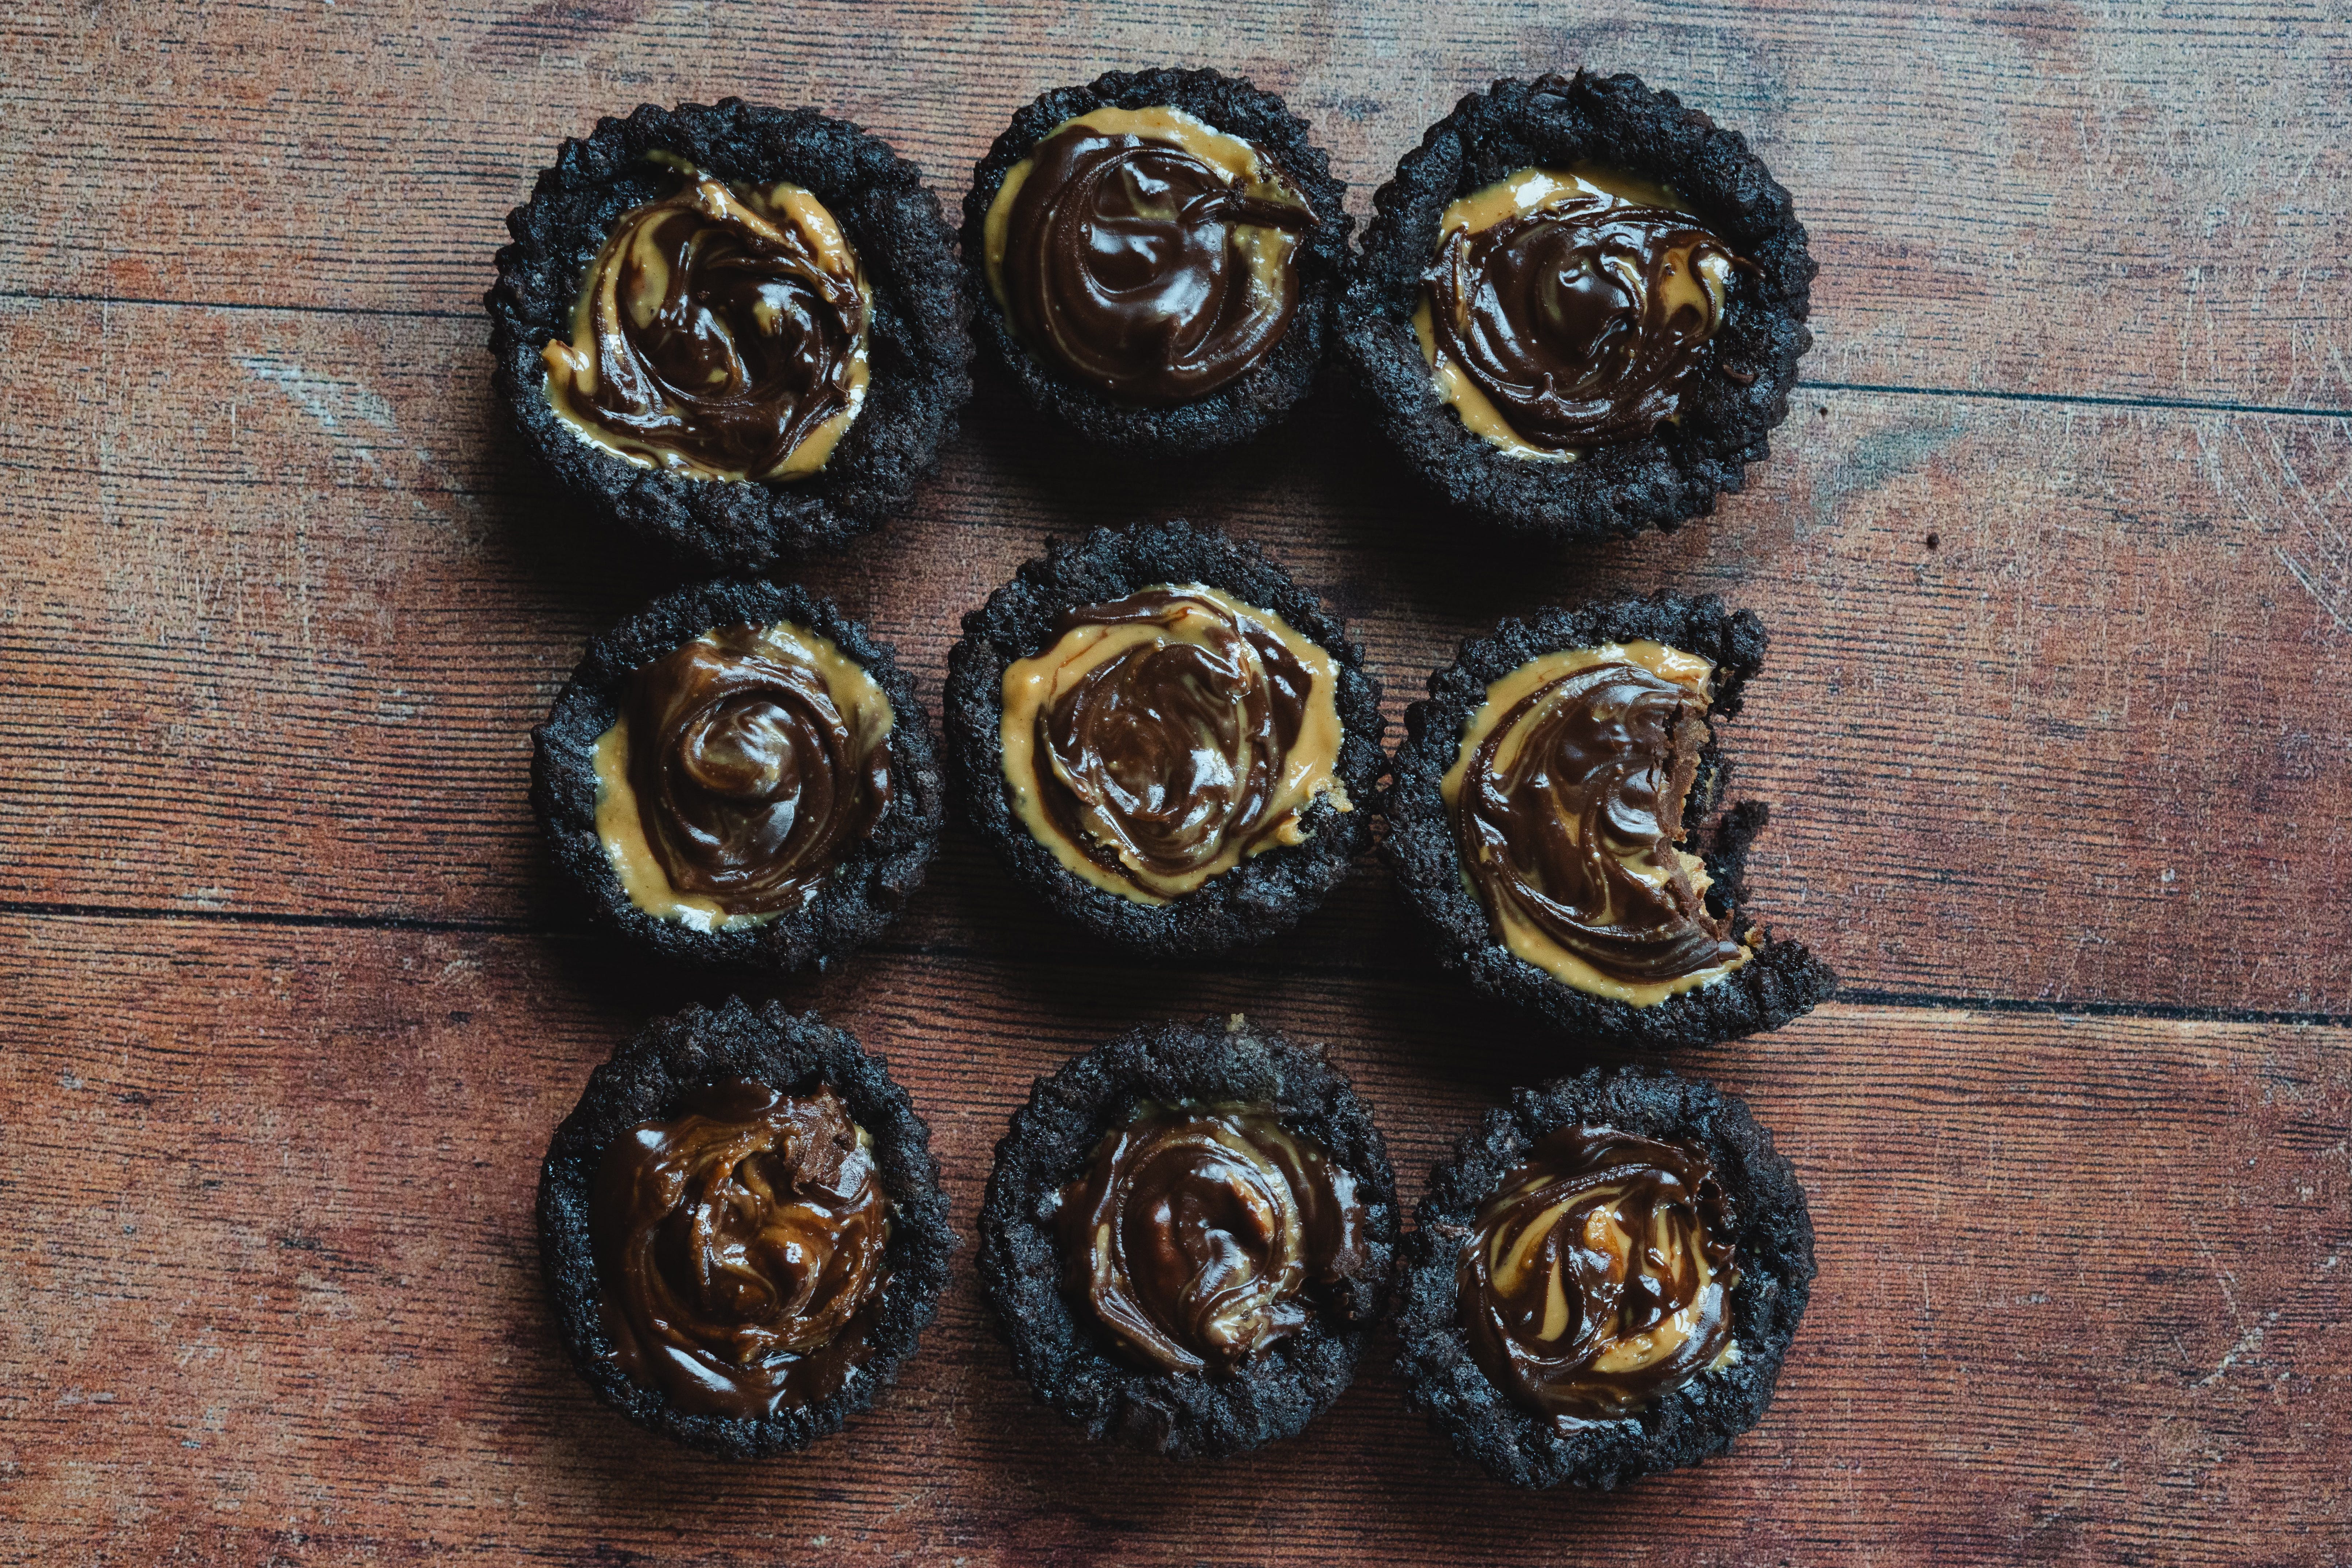
Recipe: Peanut butter and chocolate cups
Now they may not look the prettiest, but believe me when I tell you these peanut butter and chocolate cookie cups are DELISH. So much so that I did actually bake 12 - and couldn’t help but eating 3 before even taking a photo. (Had to keep the number aesthetically pleasing, of course!)
👨🍳 Prep time: Make sure your butter and egg is room temperature before you start making this recipe
🧈 Ingredients
For the Cookie Cup:
240g unsalted butter, softened (40g melted for mixing)
200g granulated sugar
220g brown sugar
2 large eggs
2 teaspoons vanilla extract
320g all-purpose flour
1 teaspoon baking powder
1 teaspoon baking soda
½ teaspoon salt
30ml milk (2 tbsp)
For the Filling / Topping:
Creamy peanut butter
100g chocolate chips
10g unsalted butter (approx 2 teaspoons)
🥣 Instructions
Preheat your oven to 180°C/160°C fan and place 12 baking cases into a cupcake tray.
Melt 40g of the butter gradually in a heatproof bowl either in a microwave on medium power in bursts of 10 seconds or in a pan over low heat.
I dont trust myself to melt butter without burning it, so find that using the ‘double boiler’ method we learned for our lemon blondies recipe very useful! Check it out here:
In a large bowl, cream together the remaining softened butter (200g), granulated sugar, and brown sugar until light and fluffy.
Add the eggs, one at a time, beating well after each addition. Stir in the vanilla extract.
In a separate bowl, whisk together the flour, baking powder, baking soda, and salt.
Gradually add the dry ingredients to the wet mixture, mixing until just combined.
Mix in the melted butter and milk until everything has just combined.
Spoon the mixture evenly into the 12 baking cases and whack it in the centre of the preheated oven for 12 minutes.
When they are still warm, gently press the centre of the cookie cups with the back of a teaspoon to create a small well. Leave to cool for 15 minutes on a cooling rack.
Once cooled, spoon in the peanut butter into the 12 cookie cups - filling roughly half or two thirds of the way depending on what peanut butter-to-chocolate ratio you want.
Add the chocolate chips and 10g butter into a heatproof bowl and either melt in a microwave on medium power for bursts of 10 seconds or place the bowl over a pan of simmering water (double boiler!). Stir until the chocolate and butter are fully melted.
Spoon the melted chocolate mix on top of the peanut butter cups, then use something like the tip of a knife, a chopstick or a fork to swirl the chocolate mix and peanut butter together.
You’re done! These taste delicious hot or cold.

These delightful treats will be perfect for sharing or enjoying as a sweet indulgence. I’m thinking of making some little treat packages for my friends as I think they’ll travel well in the post, too!
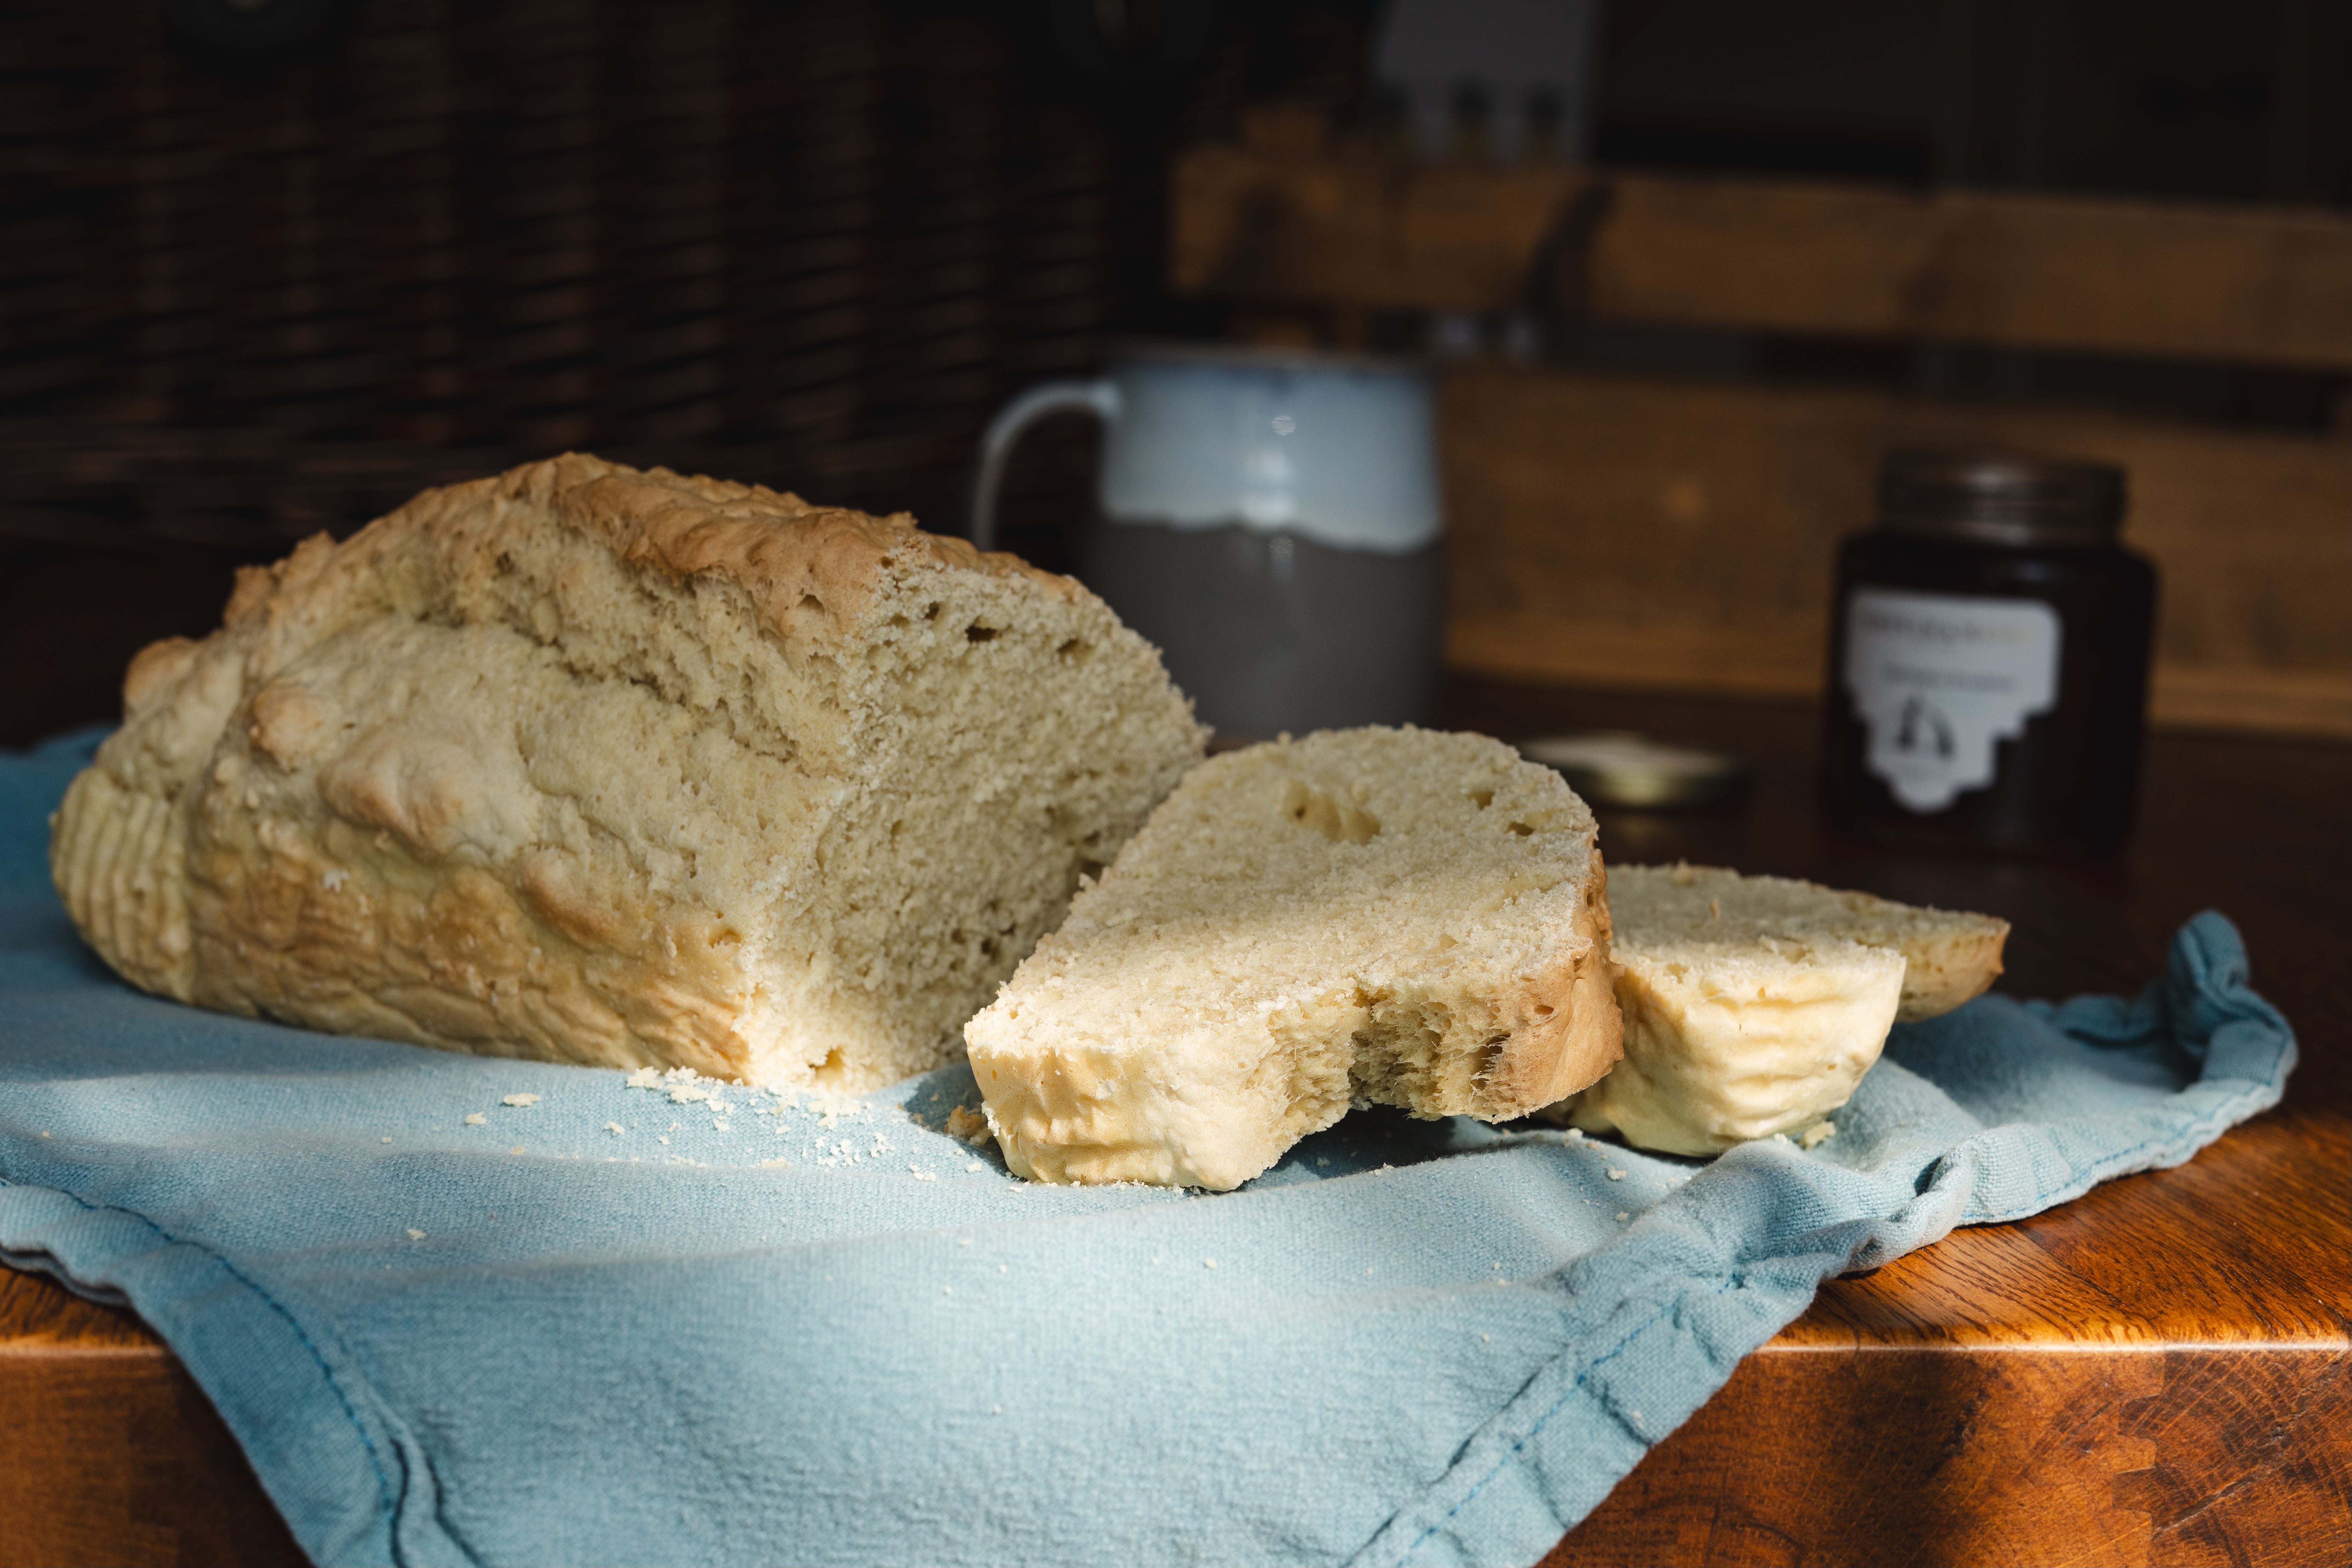
Recipe: Emergency Loaf
I’m still blown away by the magic that takes place in the kitchen, and this recipe still has me shooketh. A loaf of bread made with two ingredients?? The recipe is quite literally just self raising flour and soda. I opted for San Pellegrino sparkling water, but you could use a sparkling fruit juice, sodas, anything fizzy really!
As I opted for sparkling water, it was very pale (as there was no sugar in the mix) and it didn’t have much of a flavour to it. It did however, make for a fantastic vessel to some lovely salted butter and terrine!
🧈 Ingredients
375g self-rising flour
300ml soda or sparkling juice
🥣 Instructions
Preheat oven to 190°C/170°C fan and line an standard loaf pan with parchment paper.
Add your flour and liquid to a large mixing bowl then mix with a spatula until no flour lumps remain. The mixture should resemble a very wet dough.
Pour dough into prepared loaf pan, give the pan a little tap on your work surface and then use a spatula to spread the dough across your pan.
Bake for roughly 35 minutes or until top is lightly browned. When you apply pressure to the surface, it should bounce back - although mine was a little firmer than this and still turned out great.
Let bread cool before slicing and serving.
Nothing fancy here but so, so useful if you need bread in a pinch!
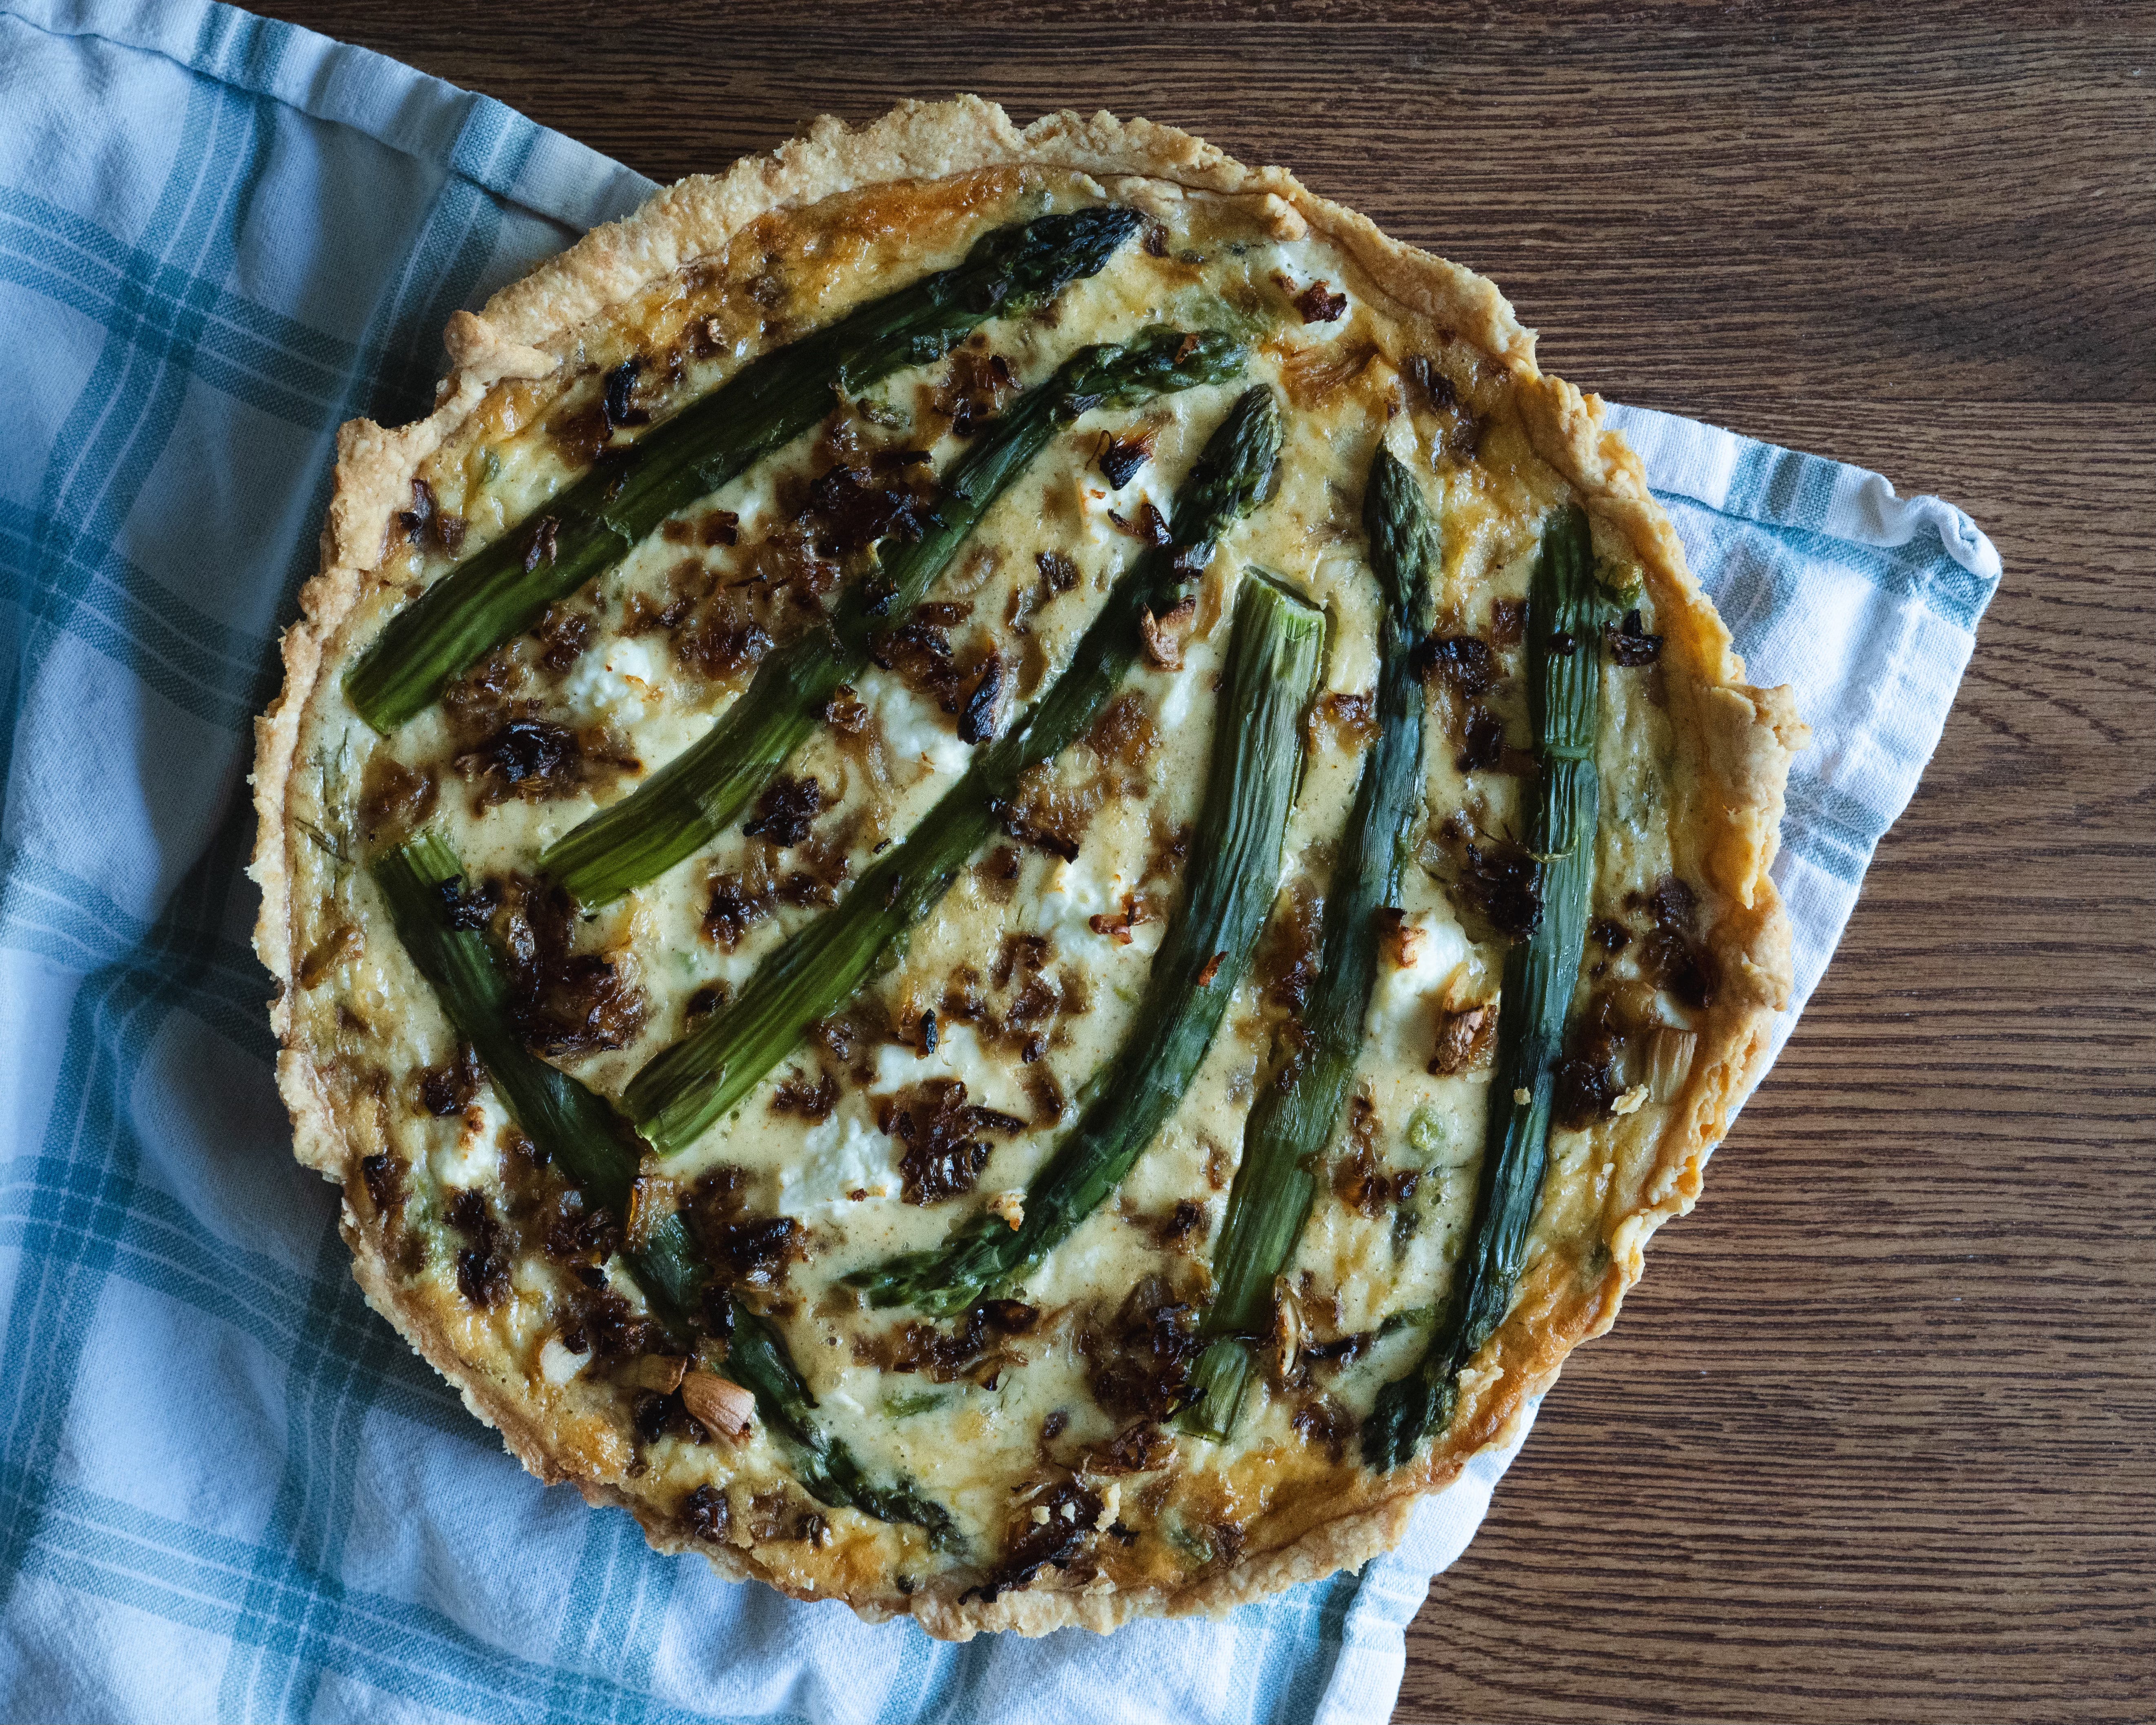
Recipe: Asparagus, feta & dill quiche
My most ambitious make yet… an asparagus, feta & dill quiche! I spotted this recipe by Melissa Thompson whilst scrolling through the BCC Good Food app looking for something easy to make whilst still feeling a but crud.
It was one of those moments where even though I was totally intimidated by the thought of making a quiche (I dont even like quiche!!), I felt compelled to at least give it a go. Before I knew it I was in the supermarket reaching for the ingredients.
Melissa’s instructions are so easy to follow and in turn, made it feel like an accessible recipe to follow. Did I realise as I closed the oven door that I’d forgotten to add in the onions? Maybe. But it tasted delicious - and that’s the main thing!
I’m sharing Melissa’s recipe below, but please take the time to give her a follow on instagram, as well as checking out her other recipes on the BBC Good Food site here
🧈 Ingredients
½ tbsp vegetable oil
1 onion, finely chopped
2 garlic cloves, crushed
500g asparagus (about two bunches), woody stalks removed
100ml double cream
300ml crème fraîche
1 tbsp natural yogurt
3 eggs
¼ tsp white pepper
¼ tsp smoked paprika
small handful of dill
200g feta, cut into 1cm cubes
For the pastry
250g plain flour, plus extra for dusting
50g vegetarian Italian-style hard cheese, grated
130g cold salted butter, cut into cubes
🥣 Instructions
Heat the oil in a pan over a medium heat and fry the onion for 5 mins. Add the garlic and cook for 5 mins more until the onion is soft but not golden. Remove from the heat and leave to cool.
Bring a large pan of salted water to the boil and cook the asparagus for 3 mins. Drain, then plunge into a bowl of cold water to stop the cooking process. Drain again. Set eight spears aside, then chop the rest into 3cm lengths.
For the pastry, combine the flour and cheese in a bowl, then rub in the butter using your fingers until the mixture resembles breadcrumbs. Add 1 tbsp cold water at a time until the mixture comes together into a dough – you may need 3-6 tbsp water. Wrap and chill in the freezer for 5 mins to firm up slightly.
Roll the pastry out on a lightly floured surface until it’s large enough to line a deep 23cm flan tin with a slight overlap. Using the rolling pin to help you, unravel the pastry over the tin and gently push the pastry into the edge. Trim the overhanging pastry so it comes up 2cm past the rim of the tin. Gently prick the pastry base all over using a fork, then return to the freezer to chill for 15 mins. Heat the oven to 200C/180C fan/gas 6.
Scrunch up a square of baking parchment, then use it to line the chilled pastry case. Fill with baking beans and bake for 15 mins. Remove the baking beans and parchment and bake for 5 mins more. Leave to cool. Meanwhile, combine the cream, crème fraîche, yogurt and eggs in a bowl, but don’t stir too hard – avoid creating bubbles. Stir in the fried onion mixture, the pepper and paprika, then fold in the dill, most of the feta and the cooked asparagus.
Put the pastry case on a baking tray. Pour in the filling, ensuring the feta and chopped asparagus are evenly distributed, then add the whole asparagus spears and remaining feta.
Put in the oven and immediately reduce the temperature to 180C/160C fan/gas 4. Bake for 35-40 mins until set with a slight wobble in the middle. Leave to cool before slicing.
Very excitedly, those cookbooks I ordered have now arrived - so this week I’ll be picking out some recipes from each and give them a shot! Please let me know if you have any recommendations.
I also recently attended another of
’s Gatherings, in which shared his 6 Foundations of Food Photography. As you know I’m very much putting as much time and effort into learning food photography, so being able to soak up some of Matt’s sage knowledge was just fantastic.I’ve had a good week or so to digest what we covered - so I hope you’ll see some improvements moving forward as I attempt to implement what I’ve learned.
More on this in next week’s post.
Until then, friends - thank you for reading. As always, it’s very much appreciated.
-Mark
Imagine if bees were flying spicy raisins! How awesome! And for the record I thought your photography was already pretty epic so I can’t wait to see what’s to come
The food and the plants are looking fantastic! I think you will need a bigger pot and maybe two or three 5' bamboo stakes for the cucamelons, they can get VERY large.